Smart Fun Easter Ideas spark big grins and keep kids busy.
Picture a table covered in colorful animal eggs and bright wreaths.
Grab your supplies.
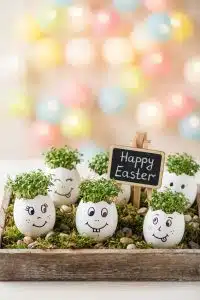
1. Hand-Painted Whimsical Woodland Animal Eggs🔥 Top Trend

Here's the plan: Grab some hard-boiled or ceramic white eggs and a set of fine-tip paintbrushes.
Sketch out simple animal faces with a light pencil before committing to paint.
Use acrylic paint to fill in the ears and muzzles of your school project eggs.
Paint a tiny flower crown on the fox egg using pink and yellow dots.
Define the eyes and whiskers with a thin black permanent marker or a micro-brush.
Nestle your woodland friends into a small wooden crate filled with dried green moss.
Scatter some tiny white dried flowers around the box to finish the look.
Style It Your Way
Floral Crown Bunnies
Stick to only white bunnies but paint unique, colorful flower crowns on every single one.
Gilded Woodland Ears
Swap the pink paint for gold leaf on the inner ears of the bear and deer for a metallic pop.
Monochrome Sketch
Use only a black fine-liner pen to draw detailed animal silhouettes for a clean, minimalist look.
Fuzzy Felt Accents
Glue on tiny pink felt triangles for ears instead of painting them to give the eggs a 3D texture.
🛒Shop the Look
Links are AI-generated suggestions - please verify before purchasing.

💡 Pro Tip: Hard-boiled eggs eventually rot. Swap them for ceramic versions so your hand-painted woodland friends last for every spring to come.
2. Artisan Carved Spring Potato Stamps💥 Highest Impact

Make it happen: Slice large yellow potatoes in half to create a flat, smooth surface for your stamp.
Trace a bunny or chick shape onto the flat side with a pencil.
Carve away the background using a small craft knife so the design stays raised.
Brush on pastel acrylic paint in thin, even layers.
Press the potato firmly onto white cardstock to create custom greeting cards.
Repeat with different colors to build a gallery of paper decorations across your room.
Let the prints dry completely before tucking them into matching envelopes.
Style It Your Way
Glitter Accents
Dust wet paint with fine gold glitter to give your bunny shapes a bit of holiday sparkle.
Fabric Printing
Swap cardstock for plain linen napkins to create a custom table set for your brunch.
Veggie Textures
Use the natural grain of a sweet potato for a more rustic, earthy print on kraft paper.
Ombre Effects
Dab two colors onto one potato stamp to get a cool gradient look on your flowers.
🛒Shop the Look
 Est.$7 - $12
Links are AI-generated suggestions - please verify before purchasing.
💡 Pro Tip: Blot the cut potato with a paper towel three times before carving. Removing excess starch prevents the paint from sliding and keeps your bunny edges cool and crisp.
3. Pastel Felt Trimmed Wooden Bunny Spatulas

The trick: Grab a set of flat wooden spatulas from a local kitchen supply store.
Paint the bottom third of the handles in soft pastel shades and let them dry on a protected surface.
Draw simple bunny faces on the flat head using a fine-tip black permanent marker.
Cut long bunny ears from stiff tan felt and nestle smaller pink felt ovals inside for the inner ear detail.
Glue the ears to the back of the spatula top and tuck a colored pom-pom at the base.
Snip small felt shapes for outfits like blue overalls or yellow dresses and anchor them to the wood with craft glue.
Add tiny buttons to the clothes and a white pom-pom tail on the back for the final touch.
Style It Your Way
Floral Crown Bunnies
Swap the pom-pom bows for tiny faux paper flowers glued between the ears for a garden look.
Polka Dot Handles
Dip the end of a paintbrush in white paint to add crisp dots over the pastel handle sections.
Gingham Scraps
Use leftover fabric scraps instead of felt to dress the bunnies in classic spring patterns.
Personalized Place Cards
Tie a small cardstock name tag around the handle to use these as
🛒Shop the Look
Links are AI-generated suggestions - please verify before purchasing.
4. Carrot and Dill Garnished Chick Appetizers

Quick win: Boil a dozen eggs and peel them carefully.
Slice most eggs lengthwise and scoop out the yolks.
Pipe the yolk mixture back into the whites in high peaks.
Press tiny black olive squares for eyes and small carrot triangles for beaks into the filling.
Set one whole egg in the center and attach sliced egg rounds for bunny ears and feet.
Tuck fresh dill sprigs and whole baby carrots with green tops around the platter for a garden look.
Arrange everything on a pastel blue plate to make the colors pop.
Style It Your Way
Spicy Chicks
Mix in smoked paprika and a drop of hot sauce for a smoky kick and extra color.
Herb Garden
Swap dill for fresh chives or curly parsley to vary the greenery on the platter.
Colorful Bunnies
Dye the bunny egg body a soft pastel purple or pink before assembling the pieces.
Peppery Beaks
Use tiny bits of red bell pepper instead of carrots for beaks to add a cool crunch.
🛒Shop the Look
Links are AI-generated suggestions - please verify before purchasing.
5. Natural Raffia Tied Timber Rabbit Silhouette💸 Best Budget Pick

Here's how to nail it: Grab a raw timber rabbit silhouette from your local craft store.
Cut several strands of natural raffia and wrap them around the bunny neck.
Tie a bow to anchor the raffia firmly.
Scatter speckled eggs and dried flowers across the table.
Nest these bunnies on a kids table as smart placeholders.
Pop a few chocolate eggs into small bowls nearby to finish the look.
Style It Your Way
Pastel Twine
Swap the raffia for mint or lavender twine to match your room theme.
Floral Crown
Glue a single dried flower onto the bunny ear for a dainty touch.
Personalized Tags
Tuck a cardstock name tag under the raffia for a quick DIY place card.
Painted Edge
Brush a thin gold line along the timber edge for a little sparkle.
🛒Shop the Look
Links are AI-generated suggestions - please verify before purchasing.
💡 Pro Tip: Brittle raffia ruins the look. Dampen strands with a spray bottle before tying to keep them flexible. This stops messy snapping.
6. Pressed Wildflower Gilded Foliage Ceramic Ovals

Worth the effort: Roll out thick air-dry clay and shape them into large ovals and eggs.
Smooth every edge with a wet sponge until they look like expensive ceramic.
Nest blue and white dried wildflowers into the wet clay surface of a flat oval.
Coat an egg shape in matte sage paint and brush on gold leaf vine patterns.
Swap plain colors for a pink watercolor marble look for your Easter tray display.
Press small clay coils into the wet pink surface to form tight, raised spirals.
Scatter these around your table with twine for some cool, fun Easter ideas.
Style It Your Way
Lavender Press
Swap the blue wildflowers for dried lavender stems to get a smart, scented holiday display.
Velvet Texture
Rub some soft velvet powder over the clay before it dries for a gorgeous, fuzzy finish.
Copper Leaf
Trade the gold paint for warm copper leaf to match dark wood furniture better.
Speckled Robin
Flick dark brown paint over the white clay to mimic a classic bird egg look.
🛒Shop the Look
Links are AI-generated suggestions - please verify before purchasing.
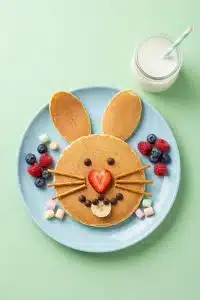
7. Golden Whipped Cream Cottontail Hotcake Platter

The game plan: Fry five pancakes in varying sizes including one large body, one medium head, two small feet, and two long ovals.
Nestle the largest pancake in the center of a rustic wood appetizer platter.
Tuck the medium circle above it for the head and drape the oval ears at the very top.
Pop the two small circles at the bottom of the body to form the bunny feet.
Swap plain butter for a massive dollop of whipped cream centered on the large pancake to form a fluffy tail.
Layer a banana slice on each foot and anchor three chocolate chips below them for cute paw pads.
Scatter fresh strawberries and blackberries around the edges for a bright look.
Serve with a glass pitcher of maple syrup to finish this bunny brunch favorite.
Style It Your Way
Savory Hare
Use fried egg feet and a scoop of mashed potato tail for a salty twist.
Chocolate Bunny
Stir cocoa into the batter for a dark rabbit that looks like a candy treat.
Confetti Cottontail
Mix rainbow sprinkles into the batter and use marshmallow fluff for the tail.
Fruit Ears
Replace pancake ears with two long strawberry slices or thick bacon strips for a crunch.
🛒Shop the Look
Links are AI-generated suggestions - please verify before purchasing.
8. Googly Eyed Pom-Pom Paper Cup Characters✨ Top Unique Idea⚡️ Quickest Win

Here's the move: Grab paper cups in pastel shades like sky blue or matte white.
Flip them upside down on a rustic wooden table.
Glue large googly eyes about halfway down the cup face.
Nestle a soft pink or purple pom-pom right under the eyes for a nose.
Cut bunny ear shapes from stiff felt and glue them to the top.
Scatter some speckled eggs around your new friends.
Hide small treats under the cups for a fun kids surprise.
Style It Your Way
Floral Crown Bunny
Glue tiny silk daisies or mini yellow daffodils around the base of the ears for a garden look.
Glitter Ear Rabbit
Swap the felt for gold glitter cardstock to add some sparkle to your Easter party ideas for kids.
Whiskered Friend
Tape three short strands of black fishing line behind the pom-pom nose to give your bunny realistic whiskers.
Brunch Place Settings
Write each guest's name on the front of the cup using a gold paint pen for a custom treat holder.
🛒Shop the Look
Links are AI-generated suggestions - please verify before purchasing.
9. Stainless Steel Meadow Fruit Cutters

Pull this off: Slice watermelon, cantaloupe, and honeydew into one-inch thick rounds.
Grab a set of bunny and chick metal cookie cutters from your kitchen drawer.
Press the cutters firmly through the fruit slices to pop out clean shapes.
Swap a honeydew bunny into a watermelon slice for a bright color contrast.
Layer these fruit puzzles across a large wooden board like a serving tray.
Tuck fresh mint sprigs and whole strawberries into the empty spots.
Scatter blueberries and raspberries to fill every tiny gap.
Nestle green grapes along the sides to anchor the display.
Style It Your Way
Tropical Twist
Swap melons for thick pineapple slices and use star-shaped cutters for a sunny feel.
Fruit Puzzles
Keep the cutouts inside the main slices but use a different colored fruit for the center.
Edible Skewers
Thread the fruit bunnies onto bamboo sticks to create fun snacks for little hands.
Yogurt Dip Station
Place a small bowl of honey yogurt in the center for a cool dipping treat.
🛒Shop the Look
Links are AI-generated suggestions - please verify before purchasing.
10. Aqua Flexible Silicone Confectionery Mold

The approach: Grab an aqua silicone mold with bunny and egg cavities from your local craft store.
Nestle pastel chocolate gems and chewy jelly beans into several empty shapes for variety.
Prep a batch of thick buttercream and tuck it into a piping bag with a small tip.
Pipe the mixture slowly into the remaining egg shapes until they are completely flush.
Scatter rainbow nonpareils or tiny sugar pearls over the wet surface for a party-ready look.
Tap the mold firmly against your table to pop any trapped air bubbles.
Chill the entire tray in the fridge for 30 minutes until the treats are solid.
Style It Your Way
Crayon Recycler
Toss broken crayon bits into the cavities and bake at low heat for custom coloring tools.
Jiggly Fruit Gems
Layer vibrant fruit gelatin inside for translucent treats that kids can play with.
Frozen Yogurt Bites
Fill the bunny shapes with Greek yogurt and berries for a healthy morning snack.
Fizzy Bath Bunnies
Press a mixture of baking soda and citric acid inside to create homemade bath bombs.
🛒Shop the Look
Links are AI-generated suggestions - please verify before purchasing.
11. Azure Plate Long-Eared Handheld Mask

Here's how: Snip an azure blue paper plate in half to create your mask base.
Carefully cut two large almond shapes for eye holes in the center curve.
Cut tall ears from pink felt and nestle them against the back of the plate.
Secure a pink pom-pom between two white ones for a cute bunny nose.
Layer pink pipe cleaners behind the nose to create whimsical whiskers.
Pop this onto a wooden craft stick so kids can hold it for festive photos.
Finish with two small white cardstock rectangles for those signature bunny teeth.
Style It Your Way
Garden Party Glam
Hot glue small faux daisies or paper blossoms around the base of the ears for a floral crown effect.
Rustic Bunny
Swap the felt for natural burlap fabric and use twine for the whiskers to get a farmhouse feel.
Sparkle Squad
Coat the blue plate in clear drying glue and scatter iridescent glitter before adding the facial features.
Hands-Free Hero
Punch holes on the sides and thread thin white elastic through so kids can wear it while hunting for treats.
🛒Shop the Look
Links are AI-generated suggestions - please verify before purchasing.
12. Speckled Glazed Stoneware Egg Crate

Here's how: Grab a dozen hard-boiled white eggs or high-quality ceramic ones.
Sketch a tiny bee or a boat with a pencil first.
Dip a thin detail brush into a watercolor palette.
Paint light washes for these Fun Easter Crafts.
Trace your dried shapes with a fine-tip black marker.
Nestle the finished eggs into a speckled stoneware crate.
Tuck a sprig of boxwood next to the crate.
Style It Your Way
Chalkboard Finish
Swap paint for black chalkboard paint and use white chalk markers for easy drawings.
Garden Markers
Write the names of fresh herbs on the shells to mark your windowsill pots.
Gilded Ovoids
Layer gold leaf on the bottom half of the eggs for a fancy look.
Pressed Petals
Glue tiny dried flowers onto the white shells for a garden-inspired display.
🛒Shop the Look
Links are AI-generated suggestions - please verify before purchasing.
13. Luminous LED Twilight Garden Shells

Here's how: Grab neon plastic eggs from the local party aisle.
Tuck a mini LED light inside and snap each shell shut.
Scatter these gems across the grass for kids to find.
Nestle some in bushes to build spring backdrop ideas for photos.
Drape warm globe lights high in the trees.
Give kids neon glow gloves so they spot their hands.
Relax at your Easter table and finally eat.
Style It Your Way
Purple Haze
Hide white eggs and use a handheld blacklight for a neon glow.
Foil Flash
Wrap shells in shiny kitchen foil to catch the overhead tree lights.
Team Colors
Assign each child one specific egg color to stop the lawn brawls.
Potted Paths
Pop glowing eggs into heavy clay pots to create a tiered hunting ground.
🛒Shop the Look
Est.$25 - $50Links are AI-generated suggestions - please verify before purchasing.
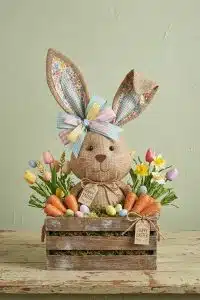
14. Vibrant Sculpted Inflatable Balloon Wreath

Here's how: Inflate long balloons in orange, yellow, and spring pastels using a hand pump.
Twist the orange balloons into tapered cone shapes to create oversized carrots.
Sculpt small yellow chicks by joining round balloons for heads and bodies.
Secure a large foil bunny head to the top of a circular wire wreath frame.
Nestle the balloon carrots and chicks around the frame using clear fishing line.
Fill any gaps by twisting pastel balloons into colorful loops and loops.
Anchor the finished masterpiece to a bright teal front door with heavy-duty hooks.
Scatter iridescent balloon eggs on the porch to complete these fun Easter ideas.
Style It Your Way
Pastel Dreamscape
Swap the neon oranges and yellows for soft lavender, mint, and powder blue balloons for a softer look.
Classroom Edition
Scale the wreath down for a classroom door and let kids help inflate the smaller round balloons.
Botanical Twist
Drape real eucalyptus or faux ivy between the balloon carrots to add organic texture to the sculpture.
Nighttime Glow
Tuck battery-operated LED fairy lights behind the balloons so the wreath shines during evening parties.
🛒Shop the Look
Est.$45 - $65Links are AI-generated suggestions - please verify before purchasing.
✨ 15. Effervescent Rainbow Pipette Experiment Kit🤫 Bonus Idea

Here's how: Snag a large white plastic tray to keep the rainbow chaos contained.
Nestle a dozen round bath bombs or baking soda eggs together in a grid.
Setup this kitchen activity outdoors to protect your floors.
Fill small cups with water and heavy drops of neon food coloring.
Hand out plastic pipettes and show kids how to squeeze and release.
Drip the neon water slowly onto the eggs to trigger bubbly reactions.
Watch them discover new colors as the fizzing puddles swirl together.
Style It Your Way
Glitter Fizz
Sprinkle fine biodegradable glitter over the dry eggs for extra sparkle during the Fun Easter Crafts.
Dino Discovery
Hide tiny plastic dinosaurs inside homemade baking soda eggs for a fossil dig twist.
Scented Surprise
Mix essential oils like lavender or lemon into the colored water for a sensory boost.
Pastel Palette
Swap the neon dyes for soft pastel watercolors to match traditional Easter Day Ideas.
🛒Shop the Look
Links are AI-generated suggestions - please verify before purchasing.
Your Mood Board
0 ideas saved
Build Your Dream Board
Tap Love on any idea to build your Pinterest collage.
Creates a Pinterest-ready collage (1000×1500px)
Conclusion
Now you have a full toolkit of Fun Easter Ideas for a party.
Swap your plain door for a vibrant balloon wreath first.
Scatter these clever crafts around the room for high energy.
Do you like rustic timber or the bright balloon style?