
Is your porch pumpkin looking a little… predictable?
You know, the same old goofy grin everyone else has.
Let's ditch the boring and try some truly clever spider pumpkin carving ideas.
These designs are pure Pinterest magic.
You're about to win Halloween.
Which Spider Pumpkin Style Matches Your Vibe?
1. Let a Screaming Spider Swarm Erupt From Your Pumpkin
Difficulty:
Medium, 1 - 2 hours
Est. Cost:
$25 - $60
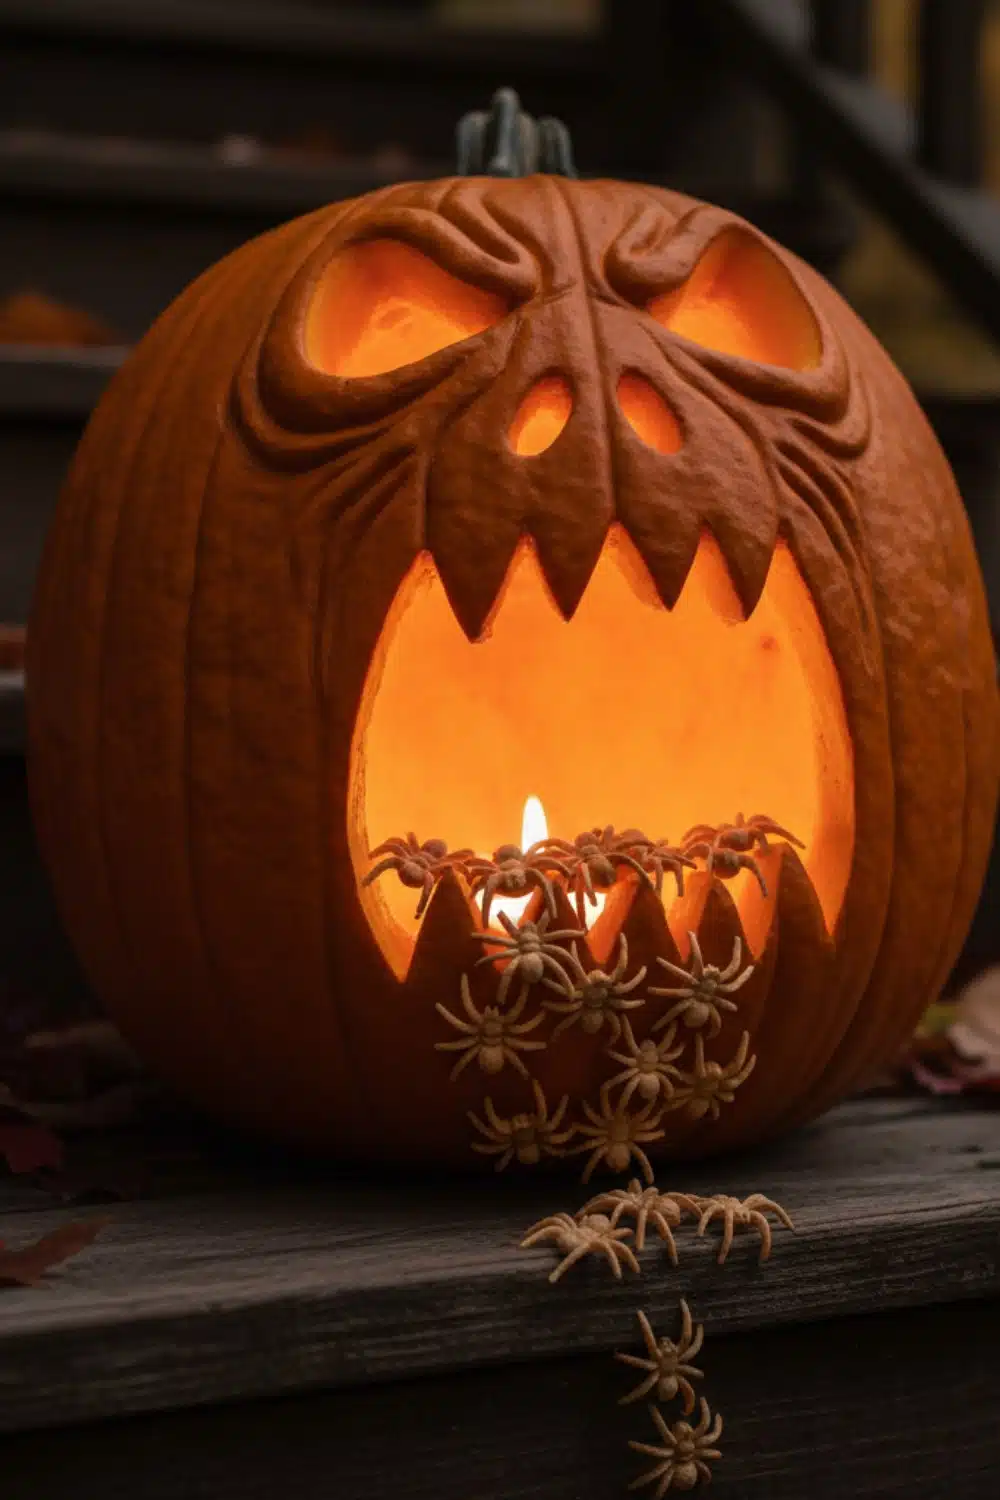
Here's the plan:
First, grab a large craft pumpkin, which is easier to carve with this much detail.
Sketch out a terrifying face with angry, wrinkled brows and a massive, screaming mouth.
Carefully carve out the eyes, nose, and the jagged teeth along the top and bottom of the mouth.
This is one of those amazing things to carve into a pumpkin that truly wows.
Place a single candle or a battery-operated LED light inside for a spooky glow.
Now for the fun part.
Get a big bag of small, creepy plastic spiders.
Create a huge swarm by pouring them inside the mouth, letting them spill out onto the steps.
Use a dab of hot glue to secure a few spiders right on the pumpkin's bottom lip for the best effect.
Style It Your Way
For a Gory Twist
Splatter some red paint around the mouth and on a few spiders. Suddenly, they're not just escaping, they're feasting.
For a Webbed Wonder
Swap the swarm for one giant spider in the mouth. Then stretch faux spiderwebs across the opening for a classic haunted house vibe.
Shopping List for This Project
💡 Shopping Tip: Look for bags of 'mixed size' plastic spiders to give your swarm a creepy, realistic depth.
Shopping links are AI-generated. Please verify details before purchasing.
2. Carve a Spooky Shadow Spider for a Minimalist Look
Difficulty:
Easy / 30-45 minutes
Est. Cost:
Under $25

How to get this look:
First, grab a smooth, medium-sized pumpkin for your canvas.
Lightly sketch a large spider design onto the flattest side.
This is one of the most simple pumpkin carving ideas you can try.
Using an etching or linoleum tool, carefully scrape away the outer orange skin along your lines.
You are not cutting through the pumpkin, just revealing the lighter flesh.
Outline all eight legs first, then carefully scrape out the spider's body.
Set your spooky creation on a rustic wooden crate to complete the look.
Style It Your Way
For a Pop of Paint
After carving, fill in the etched spider with black craft paint for a bold, high-contrast design that really stands out.
For a Web of Intrigue
Instead of one giant spider, carve a smaller one and then etch a delicate, sprawling spiderweb pattern around it.
Shopping List for This Project
Amazon
💡 Shopping Tip: For a crate that lasts outdoors, make sure it's cedar, not just plain pine.
Shopping links are AI-generated. Please verify details before purchasing.
3. Let the Pumpkin Stem Become a Creepy Spiderweb
Difficulty:
Hard | 5 - 8 hours
Est. Cost:
Under $100

Here's the plan:
First, find a large pumpkin with a fantastic, long, curved stem.
Sketch your large spider on the front and the web design wrapping up into the stem.
Use a professional-grade etching tool to carefully carve the spider's outline.
Shave the pumpkin skin around the spider to make the design pop in 3D.
Use a fine V-shaped gouge to carve the hairy texture on the spider's body and legs.
For the web, meticulously cut out each section, going all the way through the pumpkin wall.
This part requires patience, so don't rush the intricate details.
Drill two tiny holes for the spider's glowing eyes.
If you're building up your skills, try some other unique pumpkin carving ideas first.
Finish by placing a bright LED light inside for a spooky, brilliant glow.
Style It Your Way
For a Batty Twist
Ditch the spider and carve a detailed bat in relief instead. Have the web pattern radiate out from its wings for a cool effect.
For a Ghostly Web
Skip the creature and paint the pumpkin black. Then, just carve the intricate web for a high-contrast, ghostly look.
Shopping List for This Project
💡 Shopping Tip: For a spider that lasts, grab a carvable foam pumpkin instead of the real deal.
Shopping links are AI-generated. Please verify details before purchasing.
4. Hint at a Hidden Spider with Mysterious Glowing Eyes
Difficulty:
Easy, Under 1 hour
Est. Cost:
Under $25

Here's the plan:
First, grab a medium-sized pumpkin and hollow it out completely.
Next, sketch a jagged, spider-like silhouette on the front.
Carefully carve out the shape, leaving the edges rough for a more menacing look.
This is one of those spooky pumpkin carving ideas that looks way harder than it is.
Now for the magic.
Place a string of small, white LED fairy lights inside the pumpkin.
Arrange eight of the bulbs in two rows to create the glowing spider eyes.
Set your creation in a mysterious spot to complete this unique jack-o'-lantern look.
Style It Your Way
For a Classic Web Vibe
Etch a delicate spiderweb pattern around the jagged hole. Now your hidden spider has a proper home.
For a Colorful Creep-Out
Swap the white lights for eerie red or green LEDs. Suddenly, your spooky spider feels a lot more alien.
Shopping List for This Project
Home Depot
💡 Shopping Tip: For the creepiest glow, pick a pumpkin with deep ridges; they create darker shadows around the eyes.
Shopping links are AI-generated. Please verify details before purchasing.
5. Carve a Celestial Spider Constellation for a Magical Glow
Difficulty:
Hard | 3 - 5 hours
Est. Cost:
$25 - $75

How to get this look:
First, grab a tall, gourd-shaped pumpkin and give it a coat of deep navy blue paint.
Let it dry completely before you even think about carving.
Lightly sketch your spooky spider and surrounding constellation design with a pencil.
Use a rotary carving tool with a fine-point bit for all the amazing, lacy details on the spider.
Switch to a small drill bit for the stars, creating a mix of tiny and larger glowing dots.
You can find more brilliant inspiration with these enchanting star pumpkin carving ideas.
Place a bright LED light inside and watch your celestial spider glow.
Style It Your Way
For a Gilded Vibe
Skip the carving and paint the pumpkin matte white, then draw the spider and constellations with a metallic gold paint pen.
For a Classic Twist
Keep the navy base, but swap the constellations for an intricate spider web that covers the entire surface.
Shopping List for This Project
Amazon
💡 Shopping Tip: For faux gourds, always pick resin over simple plastic for a more realistic, paintable surface that looks brilliant.
Shopping links are AI-generated. Please verify details before purchasing.
6. Design a 3D Spider That Crawls Across Your Jack-O'-Lantern
Difficulty:
Hard | 4 - 6 hours
Est. Cost:
Under $75

Here's the plan:
First, select a large pumpkin for the face and a smaller one for the spider's body.
Hollow out the main pumpkin and carve a terrified face with wide eyes and a gaping mouth.
Use clay sculpting tools to create the detailed, raised eyebrows and worried expression lines.
Carve the spider's body from the smaller pumpkin and craft eight spindly legs from the leftover pumpkin pieces.
Secure the spider's body to the top of the head using toothpicks or small wooden dowels.
Artfully arrange the legs over the eyebrows and down the sides to create a creepy crawling effect.
For more detailed and artistic inspiration, check out these brilliant country pumpkin carving ideas.
Finally, place a single candle inside the mouth to cast a spooky, flickering glow.
Style It Your Way
For a Glam-Goth Vibe
Not a fan of orange? Paint the entire pumpkin and spider glossy black, then add fine silver glitter to the spider for a dramatic, spooky sparkle.
For an Easier Infestation
Skip the 3D carving and get a similar effect by carving a simple scared face and gluing an army of small plastic spiders all over it.
Shopping List for This Project
💡 Shopping Tip: For clean 3D cuts, a kit with solid stainless steel tools is your secret weapon.
Shopping links are AI-generated. Please verify details before purchasing.
7. Show a Nest of Baby Spiders Hatching from Your Pumpkin
Difficulty:
Medium / 1 - 2 hours
Est. Cost:
Under $25

Here's the plan:
Start by cutting a large, jagged hole completely through the front of your pumpkin.
Next, use an etching tool to carefully scrape away only the top layer of skin for the spiderweb design.
This lets the light shine through the lines without cutting all the way through the pumpkin wall.
Place a bunch of small plastic spiders inside the main hole, making them look like they're crawling out.
Pop a battery-operated candle inside for a spooky, long-lasting glow.
This is one of my favorite Halloween pumpkins decorating ideas because it looks way harder than it is.
Style It Your Way
For a Gothic Glam Look
Paint the pumpkin matte black first, then use a gold or silver metallic marker for the web and glue on some tiny rhinestone spiders.
For an Extra Creepy Vibe
Ditch the little spiders and place one single, oversized, fuzzy tarantula in the center so it looks like it's escaping.
Shopping List for This Project
💡 Shopping Tip: For pre-lit pumpkins, always choose LED bulbs; they run cooler and won't melt your masterpiece.
Shopping links are AI-generated. Please verify details before purchasing.
8. Create a Marching Spider Army Invading Your Pumpkin
Difficulty:
Medium | 45 - 60 minutes
Est. Cost:
Under $30

Here's the plan:
First, carve a large, clean circle into the front of your pumpkin and scoop it out.
Next, use a simple etching tool to lightly carve a spiderweb design into the pumpkin's skin.
You only want to remove the orange skin, so don't press too hard.
Create your spider invasion by gluing a line of small plastic spiders from the top of the pumpkin down to the hole.
Finish by placing a battery-operated light inside for a safe and spooky glow.
Style It Your Way
For a Ghostly Glow
Paint the etched web and the plastic spiders with glow-in-the-dark paint for a cool surprise when the lights go out.
For a Colorful Twist
Swap the black spiders for colorful or glittery ones from a craft store for a more playful, less scary vibe.
Shopping List for This Project
💡 Shopping Tip: For a creepier army, grab a pack with slightly varied sizes to create the illusion of perspective.
Shopping links are AI-generated. Please verify details before purchasing.
9. Tell a Nursery Rhyme with an Itsy Bitsy Spider Pumpkin
Difficulty:
Medium | 1 - 2 hours
Est. Cost:
Under $50

Here's the plan:
Start with a tall, oval pumpkin to get the perfect canvas.
Lightly sketch a friendly spider climbing up a wavy, ribbon-like waterspout.
Cut all the way through for the eyes and mouth to let the light pop.
Now for the magic, use a scraping tool to etch away the orange skin for the spider's body and the spout.
This technique is simpler than it looks, but for even more no-carve options, explore some easy pumpkin painting ideas.
Finally, add an LED light inside and watch your cute creation glow.
Style It Your Way
For a Spookier Vibe
Swap the cartoon smile for a more realistic spider and etch a tangled web design all around it.
For a Pop of Color
After etching your design, paint the spider black and the waterspout blue for a playful, storybook look.
Shopping List for This Project
Home Depot
💡 Shopping Tip: For potted mums, always pick the plant with the most closed buds, not the one already blooming, for a much longer-lasting show.
Shopping links are AI-generated. Please verify details before purchasing.
10. Give Your Jack-O'-Lantern Eerie Spiderweb Eyes
Difficulty:
Medium | 1 - 2 hours
Est. Cost:
Under $25

Here's the plan:
First, find a nice big pumpkin and hollow it out completely.
Carve a classic, wide-grinning mouth with a couple of square teeth.
Next, cut out a simple triangle for the nose right in the middle.
For the showstopper, sketch two large circles for the eyes.
Carefully use an etching tool to scrape away the skin inside the circles, creating a detailed spiderweb design.
This spider pumpkin carving idea is all about that delicate touch.
If spooky isn't your only vibe, you could also try some heart eye pumpkin carving ideas for a fun twist.
Finally, pop a small candle inside and watch your creepy creation glow.
Style It Your Way
For a Modern Look
Ditch the mouth and nose. Just carve the two intricate spiderweb eyes for a chic, minimalist spook.
For a Creepy Crawler Vibe
Take it up a notch by etching a small spider dangling from the nose or one of the webbed eyes.
Shopping List for This Project
💡 Shopping Tip: For the safest glow, grab flameless LED tea lights with a built-in timer.
Shopping links are AI-generated. Please verify details before purchasing.
11. Trap an Intricate Fly in a Spooky Spider Web
Difficulty:
Hard | 3 - 5 hours
Est. Cost:
Under $50

How to get this look:
First, find a perfectly round pumpkin to serve as your canvas.
Sketch your intricate fly and spider web design directly onto the pumpkin skin with a pencil.
Using a fine-tipped etching tool, carefully scrape away the outer rind to reveal the lighter flesh underneath.
Create depth and shading on the fly's body and wings by varying how deep you carve.
This kind of detailed etching takes more patience than some simpler no-carve ideas.
Use a V-shaped gouge to achieve the clean, thin lines for the spooky spider web.
Finally, place a bright light inside to make your creepy-crawly creation glow from within.
Style It Your Way
For a Gothic Glam Look
Paint the pumpkin matte black before you start carving, making the bright orange design pop for a super dramatic effect.
For the Full Story
Carve a big, spooky spider on the other side of the pumpkin, as if it's waiting for its victim to get fully trapped.
Shopping List for This Project
💡 Shopping Tip: For impossibly fine spiderweb lines, make sure your carving kit includes clay ribbon tools.
Shopping links are AI-generated. Please verify details before purchasing.
12. Add Some Bling with a Glowing Jeweled Spider Carving
Difficulty:
Medium | 2 - 3 hours
Est. Cost:
$25 - $75

Here's the plan:
First, hollow out your pumpkin from the top or bottom.
Sketch or trace a large spider design onto the front of your pumpkin.
Using a carving tool, carefully scrape away only the orange outer skin inside your spider outline, leaving the lighter flesh intact.
Apply strong craft glue within the carved area.
Press colorful, faceted craft gems into the glue, filling the spider's body and legs completely.
Add smaller clear or silver gems to fill in any gaps for extra sparkle.
Place a bright LED light inside and watch your glamorous spider glow.
Set it out on your porch as the star of your outdoor Halloween decoration ideas.
Style It Your Way
For a Glam-Goth Vibe
Ditch the rainbow. Use only black and clear gems on a white pumpkin for a seriously spooky and high-fashion look.
For a Web of Intrigue
Instead of a single spider, carve a delicate web pattern and stud the intersecting lines with tiny silver gems for a cool, graphic effect.
Shopping List for This Project
💡 Shopping Tip: For maximum glow, pick faceted acrylic gems over simple flat-backed rhinestones.
Shopping links are AI-generated. Please verify details before purchasing.
13. Give Your Pumpkin a Mysterious Spiderweb Masquerade Mask
Difficulty:
Hard / 2 - 3 hours
Est. Cost:
Under $50

Here's the plan:
First, choose a nice round pumpkin and hollow it out completely.
Carve out your classic jack-o'-lantern face with triangle eyes and nose.
Give him a big, toothy grin that's cut all the way through.
Now for the cool part, the spiderweb mask.
Using an etching tool, carefully scrape away just the top layer of pumpkin skin.
Start with lines radiating out from the center of the face.
Connect those lines with delicate, curved web strands.
Add the fancy swirls on both sides to complete the mask effect.
Place a bright LED candle inside to make your design glow.
Style It Your Way
For a Creepier Vibe
Instead of the fancy swirls, etch a big, creepy spider right on the forehead. Now he's got a friend.
For a Glam Gourd
Brush craft glue on your web lines and sprinkle with black glitter. Who says spooky can't be sparkly?
Shopping List for This Project
💡 Shopping Tip: For faux pumpkins, look for 'foam' or 'resin' materials; they look way more realistic than shiny plastic.
Shopping links are AI-generated. Please verify details before purchasing.
14. Carve an Elegant Spider Queen Crown on Your Pumpkin
Difficulty:
Hard, 2-4 hours
Est. Cost:
Under $50

Here's the plan:
Start with a smooth, white pumpkin.
Carefully cut a lid from the top and set it aside for the crown.
Clean out the pumpkin's seeds and pulp completely.
Lightly sketch your design onto the pumpkin face.
Include a side profile, a spiderweb for hair, and a small spider.
Use a fine-tipped etching tool to carve the outline of the face and the spider.
Scrape away only the outer skin for these parts.
Next, use a small carving saw to cut all the way through the spiderweb sections.
Take the pumpkin top you saved and carve a delicate spiderweb crown.
Place a bright LED light inside and set your finished crown on top.
Style It Your Way
For a Gilded Vibe
Trace the etched lines of the face and spider with a gold paint pen for a touch of royal glam.
For a Classic Look
Try this exact design on a traditional orange pumpkin for a warmer, more classic Halloween feel.
Shopping List for This Project
💡 Shopping Tip: Want a glow that’s more regal than random? Skip the weak tea lights. For a Spider Queen that truly shines, use a plug-in C7 bulb to make every detail pop.
Shopping links are AI-generated. Please verify details before purchasing.
Can't Wait to Start? Try These 3 Ideas First:
Conclusion
See?
Carving a spider pumpkin doesn't have to be boring.
With a little creativity, your porch can be the star of the block.
Go on and give one a try.
Which spooky spider design are you carving first?


