30 Must-See Outdoor Halloween Decoration Ideas That Are Actually Simple to Pull Off.
Chicken wire, PVC pipes, and spider webs.


 +27 moreideas inside
this guide may contain affiliate links.
Ready to plan your outdoor Halloween decoration ideas?
Feeling like you've seen it all before?
The same old skeletons and spiderwebs?
Don't worry, I've got you covered.
This list has the best classic scares, plus some genius new tricks.
Let's make your yard unforgettable this year.
1. Create a Magical Floating Witch Hat Light Show
Difficulty:
Easy / 1 hour
Est. Cost:
$40 - $80

How to get this look:
First, grab a pack of simple witch hats and some battery-operated LED candles.
Secure one light inside the peak of each hat using a safety pin or a dab of hot glue.
Next, tie a long piece of clear fishing line to the tip of each witch hat.
Use small, clear adhesive hooks or tacks to attach the lines to your porch ceiling.
Vary the lengths of the fishing line to create a layered, floating effect.
This simple setup is one of the most brilliant scary halloween door decorations for home you can create.
Style It Your Way
For a Spookier Vibe
Swap the warm white lights for eerie green or purple LEDs and add some wispy, fake spiderwebs for a haunted feel.
For Indoor Magic
Bring the magic inside by hanging a cluster down a hallway or in a kid's room for a wizarding world-inspired look.
Shopping List for This Project
💡 Shopping Tip: For these lights, make sure the battery pack itself is outdoor-rated, not just the hats.
Shopping links are AI-generated. Please verify details before purchasing.
2. Build a Classic Spooky Skeleton Graveyard Scene
Difficulty:
Medium | 1-2 hours
Est. Cost:
$300 - $600+

Here's the plan:
First, get several life-sized posable skeletons.
Arrange them across your lawn as if they are crawling out of the ground.
Next, scatter a variety of foam tombstones throughout the scene to build your graveyard.
Place a single, powerful spotlight off to one side, aimed low across the yard to create long shadows.
Finally, tuck a fog machine behind a tombstone to blanket the entire area in a spooky mist.
Style It Your Way
For a Ghostly Vibe
Swap the skeletons for ghoulish figures made from white sheets draped over stakes. Use blue lighting to make the whole scene feel haunted.
For a Zombie Invasion
Instead of full skeletons, use zombie props and scattered limbs crawling from the ground. Add some overturned dirt and warning signs for a full-on apocalypse.
Shopping List for This Project
Amazon
💡 Shopping Tip: For poseable skeletons, always look for locking joints to ensure your ghouls can actually hold their pose all season long.
Shopping links are AI-generated. Please verify details before purchasing.
3. Cover Your Entire House in Giant Spider Webs
Difficulty:
Hard, 4-6 hours
Est. Cost:
$300 - $500

How to get this look:
Start by purchasing super-stretch spider webs in bulk; you'll need more than you think.
Anchor the webbing at the highest points of your roofline, stretching it down over the entire facade.
Secure the web ends to railings, bushes, or lawn stakes to create a draped effect.
Position your largest spiders in the most dramatic spots, like the roof peaks and above the front door.
Place the smaller spiders climbing up the walls and across the webbing to fill in the scene.
Use a single, cool-toned spotlight from the ground or your porch light to create long, spooky shadows.
Style It Your Way
For a Glowing Infestation
Swap the white webs for glow-in-the-dark versions and add purple or green floodlights for a supernatural look.
For a Cocoon Takeover
Create large, creepy cocoon bundles from cheesecloth and stuffing, hanging them from the eaves among the spiders.
Shopping List for This Project
💡 Shopping Tip: For spiders that look truly alive, find ones with internal wire in the legs so you can pose them perfectly.
Shopping links are AI-generated. Please verify details before purchasing.
4. Welcome Trick-or-Treaters With a Glowing Pumpkin Archway
Difficulty:
Hard | 1-2 Full Days
Est. Cost:
$1,000+

Here's the plan:
Start by erecting sturdy metal garden arches to create the framework for your pumpkin tunnel.
Stock up on a huge number of pre-lit and unlit artificial pumpkins in a variety of sizes.
For the unlit ones, get creative and try some unique carving ideas to give them personality.
Build the base of each arch by stacking and securing the largest pumpkins.
Attach the smaller pumpkins to the frame with zip ties, mixing carved faces with whole pumpkins.
If your pumpkins aren't pre-lit, place battery-operated puck lights inside each jack-o'-lantern.
Finish by weaving dark faux ivy garlands throughout the arches to add a touch of spooky nature.
Style It Your Way
For a Spookier Vibe
Swap the happy grins for menacing scowls and use cool purple or green lights inside the pumpkins for a more haunted look.
For a Chic Welcome
Create a more elegant entryway by using only white and gold craft pumpkins, lit with warm white lights.
Shopping List for This Project
Home Depot
Home Depot
Wayfair
💡 Shopping Tip: For large inflatables, look for models with built-in weighted bases or extra tie-downs to prevent a spooky flyaway.
Shopping links are AI-generated. Please verify details before purchasing.
5. Tell a Spooky Story With a Witch Coven Scene
Difficulty:
Easy / 30-45 minutes
Est. Cost:
$250 - $500+

Here's the plan:
Start by acquiring three life-sized witch props and a large, black plastic cauldron.
Arrange the witches in a tight semi-circle on a prominent spot in your yard.
Place the cauldron at the center of their circle, making it the clear focal point.
Hide a green floodlight and a small fog machine inside the cauldron.
Aim the light upwards to illuminate the witches' faces and create an eerie glow from the 'potion'.
Pose your witches with props like a gnarled staff or an old book to tell a story.
Style It Your Way
For a Budget-Friendly Coven
Don't have full-size ghouls? Use three witch hats on garden stakes draped in black cheesecloth. Stuff the cauldron with green cellophane and fairy lights for a simple, spooky glow.
For Maximum Fright
Upgrade to animatronic witches that stir and cackle. Hook your fog machine and a hidden speaker with chanting sounds to a motion sensor for a truly terrifying jump-scare.
Shopping List for This Project
💡 Shopping Tip: When buying animated props, plug-in power will always outlast batteries for season-long frights.
Shopping links are AI-generated. Please verify details before purchasing.
6. Turn Your Home Into a Zombie Outbreak Zone
Difficulty:
Medium, 1-2 hours
Est. Cost:
$50 - $150

How to get this look:
First, place a zombie silhouette or a spooky window cling on the inside of your front door's glass.
Backlight the figure with a single, warm orange bulb to make it glow menacingly from within.
Nail weathered wooden planks across the door and windows to create a desperate barricade.
Drape and wrap yellow biohazard tape across your entire porch, from the posts to the railings.
Scatter a handful of dried leaves on the steps and porch floor for that final, abandoned touch.
Continue the scary movie theme inside with some killer TV stand decor for your horror marathon.
Style It Your Way
For a Classic Ghost Story
Swap the zombie for a classic ghost silhouette and replace the planks with torn, gauzy fabric. A single flickering candle light in the window completes this haunted mansion look.
For an Alien Invasion
Use an alien figure in the window and switch the biohazard tape to 'RESTRICTED AREA' tape. Add a few splatters of green glow-in-the-dark paint for a fun, sci-fi twist.
Shopping List for This Project
Amazon
💡 Shopping Tip: For window silhouettes, 'static-cling' vinyl is the secret to bubble-free application and easy-peel removal.
Shopping links are AI-generated. Please verify details before purchasing.
7. Craft Ethereal Floating Ghosts From Chicken Wire
Difficulty:
Medium, 4-6 hours
Est. Cost:
$100 - $250

Here's the plan:
First, shape chicken wire into a cylinder for the base and a rounded top for the head.
Create two ghostly arms from more wire and attach them to the body.
Next, weave cool-white LED string lights throughout the inside of the wire frame.
Drape large pieces of sheer white fabric or cheesecloth over the entire structure, letting it pool at the bottom.
Cut out two ovals from black felt or use paint to create the hollow eyes.
This ethereal look pairs beautifully with other modern farmhouse Halloween decor for a curated theme.
Finally, arrange your ghoulish group on the lawn, using stakes to secure them if needed.
Style It Your Way
For a Candy-Colored Haunt
Swap the white fabric for pastel cheesecloth and use multi-colored fairy lights for a playfully spooky spirit squad.
For a Rustic Ghost Vibe
Use burlap instead of sheer fabric and wrap them with warm, amber lights to create a group of rustic harvest spirits.
Shopping List for This Project
💡 Shopping Tip: For outdoor ghosts, find one with a sealed, weather-resistant battery pack to keep them glowing.
Shopping links are AI-generated. Please verify details before purchasing.
8. Create an Ominous Scene With a Murder of Crows
Difficulty:
Medium, 1-2 hours
Est. Cost:
$100 - $300

Here's the plan:
First, get your hands on a massive flock of black crow decorations.
The secret to this look is quantity, so more is definitely more.
Carefully arrange the crows along the peak and slope of your roofline.
Use wire or outdoor mounting tape to make sure they're secure against the wind.
Next, perch more crows throughout the branches of a bare tree right next to the house.
Cluster them together and face them in different directions for a creepy, realistic effect.
This is one of the most effective funky house decor ideas to create a truly dramatic Halloween scene.
Style It Your Way
For an Auditory Fright
Tuck a small, motion-activated speaker nearby that caws ominously whenever trick-or-treaters get close.
For a Sinister Focal Point
Add a single, larger raven or a fake skull to the highest peak as the clear leader of the flock.
Shopping List for This Project
💡 Shopping Tip: For the most placement options, look for crows that have flexible wires on their feet.
Shopping links are AI-generated. Please verify details before purchasing.
9. Unleash a Mighty Sea Monster in Your Yard
Difficulty:
Easy, Under an hour
Est. Cost:
$200 - $400

How to get this look:
Start by acquiring a set of large, pre-made octopus tentacle props.
Strategically wrap the largest tentacles around your porch columns and lamppost.
This turns everyday structures into visually stunning designs.
For the tentacles emerging from the ground, dig shallow holes or pile mulch around the base to create a realistic effect.
Finally, aim a landscape spotlight at your creation to make it pop after dark.
Style It Your Way
For a Shipwreck Vibe
Drape old fishing nets and weathered ropes around the tentacles and your porch railing. Add a broken wooden barrel or an old anchor nearby to complete the lost-at-sea look.
For a Bioluminescent Look
Paint the suction cups with glow-in-the-dark paint for a creepy, otherworldly effect. You could also weave blue or green string lights around the tentacles for a deep-sea glow.
Shopping List for This Project
💡 Shopping Tip: For giant yard stakes, look for included metal ground spikes over plastic ones for better stability on windy nights.
Shopping links are AI-generated. Please verify details before purchasing.
10. Grow a Creepy Man-Eating Plant Garden Display
Difficulty:
Easy / 30 minutes
Est. Cost:
$100 - $250

Here's the plan:
Start with a cleared patch in your garden bed, using fresh, dark soil as your base.
Source a collection of ghoulish, man-eating plant statues, mixing up colors like green and purple.
Cluster the statues together, staggering their positions to look like a creepy little patch.
Add a few garden gnomes to the scene, strategically placing one to look like it's being devoured.
Plant some bright yellow marigolds and variegated hostas around the display to make the creepy colors pop.
This scene works great along a border or near a wall, which you could also spruce up with some off-the-wall gorgeous ideas.
Style It Your Way
For an Indoor Invasion
Forget the garden. Bring one or two of these creatures inside and place them among your houseplants on a shelf for a hilarious, unexpected surprise.
For Nighttime Frights
Tuck small, solar-powered LED spotlights behind the statues, aimed up at their toothy grins to make them glow menacingly after dark.
Shopping List for This Project
Home Depot
💡 Shopping Tip: For resin props like these, choose ones with a built-in UV coating to prevent the cool, vibrant colors from fading.
Shopping links are AI-generated. Please verify details before purchasing.
11. Make Your Bushes Stare With Lurking Glowing Eyes
Difficulty:
Easy / Under 30 minutes
Est. Cost:
Under $20

Here's the plan:
Start by collecting empty cardboard tubes from paper towels or toilet paper.
Cut different spooky eye shapes into the middle of each tube.
Paint the outside of the tubes black so they disappear in the dark.
Activate different colored glow sticks and slide one inside each tube.
Tuck them deep into your bushes or trees for a perfectly creepy effect.
Style It Your Way
For a Kid-Friendly Vibe
Swap the scary red glow sticks for friendly pinks and blues. Cut big, round, happy eye shapes so your bushes look curious, not creepy.
For an Enchanted Forest
Use only white or pale blue lights for a magical, ghostly glow. It's less 'monster in the bushes' and more like you've stumbled into a
Shopping List for This Project
💡 Shopping Tip: For outdoor eyes, check for a weather-resistance rating of IP44 or higher to keep them glowing through the rain.
Shopping links are AI-generated. Please verify details before purchasing.
12. Give Guests a Fright With a Ghostly Rocking Chair
Difficulty:
Easy, Under an hour
Est. Cost:
$75 - $200

Here's the plan:
Find a dark, forgotten corner on your porch or in your entryway.
Place an old wooden rocking chair right in the center.
Drape a simple, dark woven throw over the back for an eerie touch.
Hang a single industrial-style pendant light directly overhead.
This dramatic spotlight creates the perfect moody decor vibe, but with a terrifying twist.
For extra points, set it up where a breeze can make it rock on its own.
Style It Your Way
For an Abandoned Look
Ditch the blanket and go heavy with the fake cobwebs, stretching them from the chair to the floor and walls.
For a Haunted Nursery Vibe
Place a spooky, cracked doll in the seat and hide a small speaker nearby that faintly plays a music box tune.
Shopping List for This Project
Home Depot
💡 Shopping Tip: For a wood rocker that lasts outdoors, choose rot-resistant woods like teak, acacia, or cedar.
Shopping links are AI-generated. Please verify details before purchasing.
13. Hang These Creepy-Crawly Glowing Spider Egg Sacs
Difficulty:
Easy / 1-2 hours
Est. Cost:
$50 - $100

How to get this look:
First, grab some battery-operated warm white fairy lights.
Bunch them up into a loose ball to create the glowing core.
Drape a large square of white cheesecloth or gauze over the lights.
Gather the fabric at the top and tie it off securely with a strip of white cloth.
Let the bottom of the fabric hang down to create a spooky tail.
Now, stick plastic spiders of various sizes all over the outside of the sac.
For an extra creepy touch, dangle a few smaller spiders from the bottom with clear fishing line.
Hang your finished spider sacs from tree branches and enjoy the eerie glow.
Style It Your Way
For a Harvest Glow
Ditch the spiders and wrap the lights in orange tulle instead of white gauze. It's a quick switch for a classic pumpkin-patch glow.
For a Touch of Horror
For a more sinister vibe, lightly splatter some red craft paint onto the finished sacs. It'll look like something definitely hatched.
Shopping List for This Project
💡 Shopping Tip: For the most skin-crawling effect, choose sacs with warm-white LEDs over cool-blue ones.
Shopping links are AI-generated. Please verify details before purchasing.
14. Shock Your Neighbors With a Spider's Cocooned Victim
Difficulty:
Medium, 1-2 hours
Est. Cost:
$100 - $300

Here's the plan:
First, get a life-sized posable mannequin or skeleton to create your victim.
Find a strong, low-hanging tree branch that can handle the weight.
Securely hang the mannequin upside down using heavy-duty rope or wire.
Densely wrap the entire figure in stretchy, white spider webbing until it's completely covered.
Attach a giant black spider decoration near the top of the cocoon.
Finally, place a single outdoor spotlight on the ground aiming straight up to create that haunting glow.
Style It Your Way
For a Haunted Forest Vibe
Don't stop at one. Make several smaller cocoons using foam mannequin heads and hang them from multiple branches for a full infestation.
For an Extra Gory Look
Add a string of red LED lights inside the cocoon before you finish wrapping it. This will give it a creepy, pulsating glow from within.
Shopping List for This Project
💡 Shopping Tip: For spotlights, look for models that include colored lens caps for an extra spooky glow.
Shopping links are AI-generated. Please verify details before purchasing.
15. Create a Creepy Clown Carnival Entryway
Difficulty:
Hard | A full weekend project
Est. Cost:
$1,000+

How to get this look:
First, build a long, narrow frame over your walkway using wood or PVC pipes.
Drape red and white striped fabric along the inner walls, letting it hang unevenly.
Tatter the edges of the fabric with scissors for a worn-out, creepy vibe.
String a mix of red and white pennant banners across the ceiling of your tunnel.
Hang rows of outdoor string lights with red and green bulbs to cast an eerie glow.
Flank the entrance with two large, menacing clown statues to act as terrifying greeters.
Style It Your Way
For a Budget-Friendly Haunt
Ditch the statues and hang creepy clown masks from the ceiling at different heights. Add a fog machine at the entrance for a truly ghostly effect.
For an Interactive Nightmare
Line the interior walls with funhouse mirrors to disorient guests. Hide a speaker inside to play distorted carnival music on a loop.
Shopping List for This Project
Home Depot
💡 Shopping Tip: For that perfect creepy carnival glow, grab string lights with warmer, amber-toned bulbs instead of bright white ones.
Shopping links are AI-generated. Please verify details before purchasing.
16. Craft Sophisticated and Spooky Terrarium Lanterns
Difficulty:
Medium, 1-2 hours per lantern
Est. Cost:
$75 - $150

How to get this look:
First, grab two large, gothic-style black lanterns.
For the crypt scene, find a miniature stone archway to place in the back.
Fill the base with dark aquarium gravel and patches of green craft moss.
Lean a small skeleton figure inside, making it look relaxed and resigned.
Stick a small, battery-powered LED light inside the top of the arch for a perfect spotlight.
For the carnivorous plant lantern, create a bog with dark soil and moss.
Plant a fake pitcher plant or Venus flytrap right in the center.
Add some faux cattails and tall grass for a wild, overgrown look.
Scatter a few creepy-looking bits around the base to complete the scene.
Style It Your Way
For a Ghostly Vibe
Fill the lantern with wispy cotton batting to create a thick fog.
For a Haunted Forest
Create a miniature forest with tiny twigs, moss, and a lone plastic crow inside.
Shopping List for This Project
💡 Shopping Tip: For battery-powered lanterns, look for models with a built-in timer to keep the spooky glow going effortlessly.
Shopping links are AI-generated. Please verify details before purchasing.
17. Create a Menacing and Un-Fairy Mushroom Circle
Difficulty:
Easy / 30 minutes
Est. Cost:
$300 - $600+

How to get this look:
First, source a set of large, sculptural mushroom lights.
Look for ones with a spooky, ethereal green glow.
Pick an open, prominent spot in your yard for the most impact.
Arrange the mushrooms in a wide, imposing circle.
Mix up the cap designs to make the circle feel more organic and strange.
This creates an enchanting effect, much like the ones seen in these magical room ideas.
Wait for dusk, then switch them on to welcome the ghouls.
Style It Your Way
For a Guided Path
Forget the circle. Line your walkway with these mushrooms to guide guests on a magical journey to your door.
For a Forest Floor Vibe
Ditch the ring and cluster these glowing fungi under a big tree. It'll look like a hidden, enchanted forest floor popped up in your yard.
Shopping List for This Project
💡 Shopping Tip: For solar mushrooms, look for an IP65 waterproof rating to survive autumn rain and wind.
Shopping links are AI-generated. Please verify details before purchasing.
18. Display a Haunted Blueprint of Your Own Home
Difficulty:
Medium, 2-3 hours plus printing time
Est. Cost:
$75 - $175
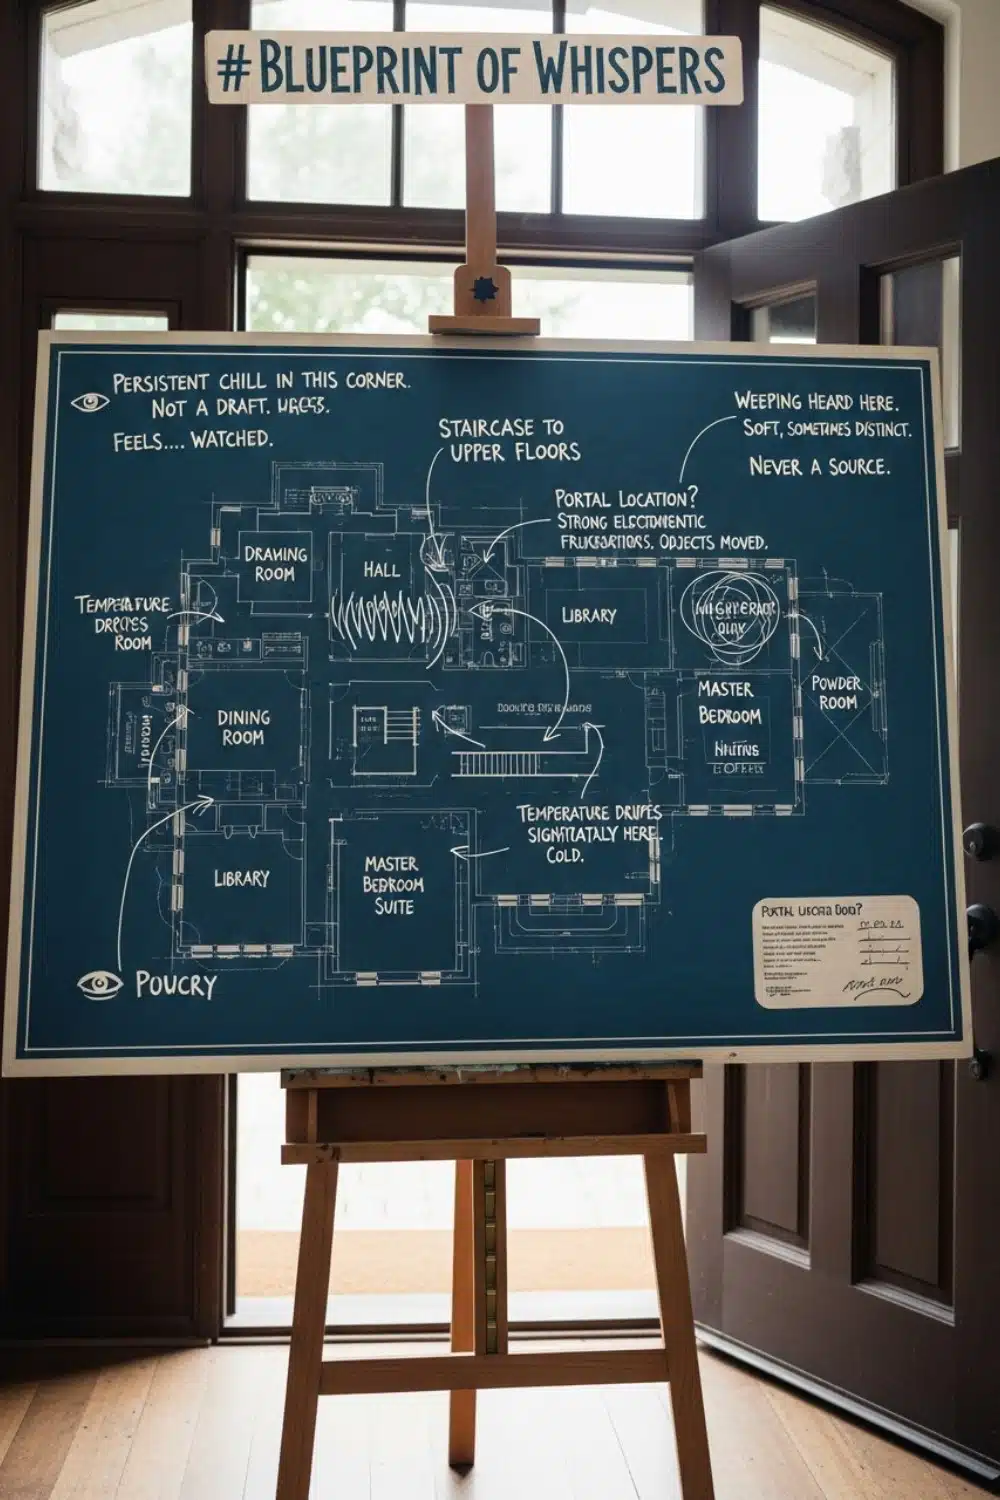
Here's how to chart your own haunting:
First, grab a standard wooden artist's easel to serve as your display stand.
Find or create a basic floor plan of your own house.
Use a simple design app to convert it into a blueprint style with white lines on a dark blue background.
Now for the fun part: add spooky, handwritten-style notes all over it.
Mark cold spots, mysterious sounds, or where you get that 'watched' feeling.
Get your final design professionally printed on a large foam board to make it look official.
Create a small, matching sign for the top with a catchy, creepy hashtag.
Place it by your front door to give guests a personalized scare before they even ring the bell.
Style It Your Way
For an Ancient Curse Vibe
Ditch the blueprint style for an old-world treasure map look. Use tea-stained paper, burn the edges, and add notes like 'Here be ghosts' for a vintage horror feel.
For a Nighttime Reveal
Use glow-in-the-dark paint pens for the spooky annotations. The board will look like a normal blueprint by day, but reveal its ghostly secrets at night.
Shopping List for This Project
💡 Shopping Tip: For outdoor displays, choose an easel with adjustable legs to keep it steady on an uneven lawn.
Shopping links are AI-generated. Please verify details before purchasing.
19. Make an Interactive 'Leave a Spell' Treat Station
Difficulty:
Easy / 20 minutes to set up
Est. Cost:
$150 - $300

Here's the plan:
First, find a vintage-style wooden lectern to act as your station's base.
Place a large, open 'spell book' prop right in the center.
Add a battery-operated lantern and a quill-and-inkwell set for an old-world glow.
Hang a 'Leave a Spell, Take a Treat' sign from the front to invite trick-or-treaters.
Next to the stand, place a large wooden bowl brimming with candy.
Elevate your candy bowl on a rustic tree stump for a touch of woodland magic.
Style It Your Way
For a Mad Scientist Vibe
Swap the spell book for a 'lab journal' and add some bubbling beakers and colorful test tubes instead of a lantern.
For a Cauldron Twist
Replace the candy bowl with a bubbling cauldron and fill it with dry ice for a spooky, smoky effect.
Shopping List for This Project
Wayfair
💡 Shopping Tip: When buying wicker for outdoors, always choose 'resin wicker' for a brilliant, weather-proof basket that won't fall apart.
Shopping links are AI-generated. Please verify details before purchasing.
20. Build Goofy and Colorful Monsters From Old Tires
Difficulty:
Easy, 15 minutes
Est. Cost:
$30 - $75

How to get this look:
Start with a fresh, clean face, focusing on hydrated skin to get that natural glow.
Groom your eyebrows, brushing them up for a full yet tidy appearance.
Apply a sheer foundation or tinted moisturizer for light, even coverage.
Keep the eyes simple with just a coat of mascara to define your lashes.
Choose a matte lipstick in a natural, rosy-nude shade.
Pull on a simple white crewneck t-shirt for a crisp, clean base.
Finish the look with a classic black cotton bucket hat.
Style It Your Way
For a Grungy Twist
Swap the white tee for an oversized band t-shirt and add a chunky silver chain necklace. Now you're ready to rock.
For a Playful Vibe
Trade the black bucket hat for one in a bright color like pastel yellow or baby blue. Instant pop of personality.
Shopping List for This Project
💡 Shopping Tip: For a quality white tee that isn't see-through, look for a fabric weight of 5.5 ounces or more.
Shopping links are AI-generated. Please verify details before purchasing.
21. Give Guests Chills With a 'Beating Heart' Porch
Difficulty:
Medium, 2-4 hours
Est. Cost:
$25 - $75

Here's the plan:
Start with a dark-colored wood deck or porch.
If your deck isn't dark, a coat of black stain creates the perfect moody base, much like the drama from a bold black wall.
Carefully cut one of your deck planks to create a gap, or use an existing expansion joint.
Install an outdoor-rated red LED strip light in the space just below the opening.
For the full effect, connect the light to a controller that can create a slow, pulsing glow.
Style It Your Way
For a Mad Scientist Vibe
Swap the red light for a ghoulish green glow to make it look like a monster is trapped under your porch.
For Maximum Scares
Hide a small Bluetooth speaker nearby playing a slow, muffled heartbeat sound effect that syncs with the light.
Shopping List for This Project
💡 Shopping Tip: Get a kit with a remote control so you can program a cool pulsing 'heartbeat' effect.
Shopping links are AI-generated. Please verify details before purchasing.
22. Create a Monster Shadow With a Pile of Junk
Difficulty:
Medium | 1-2 hours
Est. Cost:
$50 - $100

Here's the plan:
First, get yourself an outdoor spotlight and position it high, pointing down at a blank exterior wall.
The secret to the monster shape is a cutout made from plywood or very sturdy cardboard.
Create your werewolf silhouette and cut out the eyes and mouth so the light shines through.
Build a messy pile of firewood and old yard tools a few feet away from the wall.
Carefully place your monster cutout within the woodpile, hiding it from direct view.
Use two leaf rakes to form terrifying, claw-like hands.
Fiddle with the placement of everything until your shadow monster looks perfectly menacing.
Style It Your Way
For an Arachnophobe's Nightmare
Swap the werewolf for a more abstract, spidery shape using old pipes, bent hangers, and tangled garden hoses to create a creepy crawler.
For a Hauntingly Simple Vibe
Create a classic ghost shadow by draping a white sheet over a tomato cage hidden in your pile. It's an easy and timeless scare.
Shopping List for This Project
💡 Shopping Tip: For the spookiest shadow, get a spotlight with a narrow beam angle to keep your monster's edges sharp.
Shopping links are AI-generated. Please verify details before purchasing.
23. Design a Grotesque Alien Fungal Wall Growth
Difficulty:
Hard | 8-12 hours
Est. Cost:
$100 - $300+

Here's the plan:
Start by sculpting your alien growth from a large block of polymer or air-dry clay.
This is your chance to make one of those visually stunning & unique designs for your own yard.
Focus on a main shelf-like body with smaller mushroom shapes and long, reaching tendrils.
Use carving tools to add deep, creepy holes and organic wrinkles near the center.
Once the clay is fully cured, prime the entire piece.
Use an airbrush or sponges to blend a vibrant lime green from the core outwards.
Next, carefully add a rich purple to the edges and tips of the tendrils.
Finish with several coats of high-gloss varnish to achieve that perpetually wet look.
Mount it securely to a tree trunk for a brilliant sci-fi horror surprise.
Style It Your Way
For a Bioluminescent Fright
Use glow-in-the-dark green paint and black accents instead of purple. It’ll look extra creepy when the sun goes down.
For a Body-Horror Vibe
Swap the alien colors for deep reds, browns, and sickly yellows. It'll look less like an alien and more like a terrifying Earth-born disease.
Shopping List for This Project
Amazon
💡 Shopping Tip: For maximum creepiness, choose sculptures with a matte finish to avoid a cheap, glossy plastic look.
Shopping links are AI-generated. Please verify details before purchasing.
24. Craft Tiny, Detailed Bell Jar Graveyard Displays
Difficulty:
Easy to Medium, about 20-30 minutes per cloche
Est. Cost:
$25 - $60 per cloche

How to get this look:
Start with a glass bell jar, also called a cloche, with a sturdy base.
Glue down a generous layer of green craft moss to create your spooky lawn.
Carve out a small walkway and fill it with tiny white gravel or sand.
Press a couple of miniature tombstones into the moss on either side of your path.
Position your tiny skeletons, one sitting by a tombstone and another on the path.
Add a few small, dried sprigs to look like dead trees or overgrown weeds.
Set them up together for a cool centerpiece or scatter them as spooky buffet table accents.
Style It Your Way
For a Haunted Forest Vibe
Swap the skeletons for tiny ghost figures and add miniature, bare-branched trees instead of tombstones for a ghostly woodland scene.
For a Cozy Autumn Look
Ditch the graveyard and fill the cloche with mini pumpkins, faux autumn leaves, and a single flickering LED tealight for a classic harvest feel.
Shopping List for This Project
💡 Shopping Tip: For a crystal-clear view of your tiny terrors, always choose a cloche with a real glass dome, not acrylic.
Shopping links are AI-generated. Please verify details before purchasing.
25. Make Ghostly Footprints Appear Only When It Rains
Difficulty:
Easy; 30 minutes
Est. Cost:
Under $50

Here's the plan:
First, grab a footprint stencil and a can of superhydrophobic spray.
Make sure your walkway is completely clean and dry before you start.
Place your stencil flat on the concrete where you want the first print.
Apply a light, even coat of the hydrophobic spray over the stencil.
Carefully lift and reposition the stencil to create a walking path.
Let the spray cure fully according to the can's directions.
Now, just wait for a rainy day for your ghostly footprints to appear.
Style It Your Way
For a Nighttime Fright
Instead of rain-activated spray, use glow-in-the-dark paint. Your ghostly path will appear as soon as the sun goes down.
For a Creature Feature
Ditch the human feet and use an animal track stencil. Imagine spooky wolf paws appearing on your walkway in the rain.
Shopping List for This Project
💡 Shopping Tip: For the sharpest ghostly footprints, make sure the kit you buy includes a true super-hydrophobic spray.
Shopping links are AI-generated. Please verify details before purchasing.
26. Tell Interactive Ghost Stories With QR Codes
Difficulty:
Easy / Under 1 hour
Est. Cost:
$40 - $100

Here's the plan:
First, grab a realistic-looking foam tombstone from a craft or Halloween store.
Give it an ancient look by gluing clumps of green and brown craft moss around the edges.
Next, create your ghost story or spooky video and host it online somewhere.
Use a free online generator to create a QR code that links directly to your story.
Print the QR code onto weather-resistant sticker paper and press it firmly onto the tombstone.
Set it up in your yard and use a small spotlight to make it glow eerily after dark.
Style It Your Way
The Analog Apparition
Ditch the tech and paint a spooky riddle directly on the stone. The answer can lead guests to a hidden treat or another clue in your yard.
The Socially Deceased
Make it modern and hilarious. Link the QR code to a fake Instagram or TikTok profile for your 'ghost,' complete with spooky selfies.
Shopping List for This Project
Home Depot
💡 Shopping Tip: For a tombstone that looks truly ancient, skip the flimsy foam and look for heavier, more durable resin props.
Shopping links are AI-generated. Please verify details before purchasing.
27. Create a Haunting Scene With an Abandoned Apiary
Difficulty:
Easy / 1-2 hours
Est. Cost:
$50 - $150

How to get this look:
First, get your hands on a few wooden boxes to mimic beehives.
You can often find old ones for cheap or build your own simple squares.
Give them a weathered finish with a thinned-out, gloomy paint wash.
This is a key trick used in many stylish grey fall decor ideas.
Stack them slightly askew in a patch of tall, wild grass.
Liberally stretch fake spiderweb material across the corners and between boxes.
For the final chilling touch, wedge a plastic skeleton hand into one of the openings.
Make it look like it's trying to claw its way out.
Style It Your Way
For a 'Killer Bee' Vibe
Add oversized, menacing-looking fake bees with red LED eyes around the hives and post a bloody 'BEWARE' sign nearby.
For a 'Honey & Horror' Look
Drizzle amber-colored slime or resin from the hive entrances to create a creepy, cursed honey effect.
Shopping List for This Project
💡 Shopping Tip: For weathered props, zoom in on product photos to make sure the 'aging' isn't just a flat, printed texture.
Shopping links are AI-generated. Please verify details before purchasing.
28. Line Your Porch Railing With Weeping Specimen Jars
Difficulty:
Easy / Under 30 minutes
Est. Cost:
$25 - $50

How to get this look:
First, gather a collection of clear glass jars; recycled food jars are perfect for this.
Next, hunt for creepy plastic toys like snakes, oversized eyeballs, and doll heads.
Fill each jar with water, adding a tiny drop of yellow food coloring for that aged specimen look.
Place your items inside, creating some visually stunning & unique compositions.
Line them up along a dark railing or shelf for an instant mad scientist vibe.
Style It Your Way
For a Bioluminescent Vibe
Swap the plain water for tonic water. Place a blacklight nearby and watch your specimens glow with an eerie blue light.
For a Witch's Pantry
Skip the water and fill your jars with dried moss, twigs, and dark spices. Add aged paper labels with names like 'Wolfsbane' or 'Mandrake Root'.
Shopping List for This Project
💡 Shopping Tip: For a convincing look, choose jars with drips made from matte resin instead of shiny plastic.
Shopping links are AI-generated. Please verify details before purchasing.
29. Hang These Modern, Minimalist Geometric Ghost Windsocks
Difficulty:
Medium / 4-6 hours
Est. Cost:
$100 - $300

Here's the plan:
First, source weather-resistant white fabric and thin rods for the internal frames.
Construct simple geometric frames for your shapes like cubes and pyramids.
Think of these as unique furniture designs for your porch.
Sew custom fabric covers to tightly fit over each of your frames.
Attach thin, strong wire or fishing line to the top corners for hanging.
Install screw-in eyelet hooks into your porch ceiling or a wall bracket.
Hang your creations at different heights to create a floating, modern art installation.
Style It Your Way
For a Nighttime Haunt
Swap the white fabric for a semi-translucent material and place battery-operated LED lights inside each shape for an eerie, floating glow at night.
For a Pop Art Vibe
Don't stick to white. Use bold, colorful ripstop nylon in shades like black, orange, or even lime green for a vibrant, modern art vibe.
Shopping List for This Project
Amazon
Amazon
💡 Shopping Tip: For crisp geometric shapes, seek out windsocks made from weatherproof polyester or ripstop fabric to prevent sagging.
Shopping links are AI-generated. Please verify details before purchasing.
30. Build a Creepy Whispering Organ From PVC Pipes
Difficulty:
Medium | 2-3 hours
Est. Cost:
$75 - $150

How to get this look:
First, gather PVC pipes in a few different widths for visual interest.
Cut the pipes into lots of different lengths to create that staggered, organ-like profile.
Use PVC elbow joints to add some funky angles and personality to your sculpture.
This is one of those creative furniture flips that uses cheap materials for a big impact.
Cluster all your finished pipes tightly together, placing them directly against a flat exterior wall.
Finally, position a single warm spotlight on the ground in front of the pipes, aiming it straight up.
This creates those cool, super-long shadows that make the whole thing look dramatic.
Style It Your Way
For an Indoor Art Vibe
Bring it inside as a wild floor lamp. Paint the pipes matte black and hit them with a color-changing LED bulb for an instant art installation.
For Maximum Creep Factor
Want to really freak people out? Hide a small bluetooth speaker inside one of the taller pipes and play a loop of faint, spooky whispers.
Shopping List for This Project
Home Depot
💡 Shopping Tip: For the smartest spook factor, get an RGB uplight to bathe your creation in ghoulishly brilliant color.
Shopping links are AI-generated. Please verify details before purchasing.
Can't Wait to Start? Try These 3 Ideas First:
Conclusion
See?
You don't need a Hollywood budget to win Halloween.
These ideas are totally doable and look amazing.
Just pick one that feels fun and go for it.
Your neighbors are going to be so jealous.
So, which spooky idea are you going to try first?


