
Tired of the same old Halloween cards?
Worried yours will just get lost in the shuffle?
These Halloween cards handmade ideas add a magical twist no one will see coming.
Let's make something they'll talk about all year.
Which Halloween Card Style Matches Your Vibe?
We've saved our most creative idea for last, waiting for you at the very end of this list. Trust us, it's worth the scroll!
1. Create a Peek-a-Boo Mummy Handmade Card to Surprise Your Friends
Difficulty:
Easy / 15 minutes
Est. Cost:
Under $20
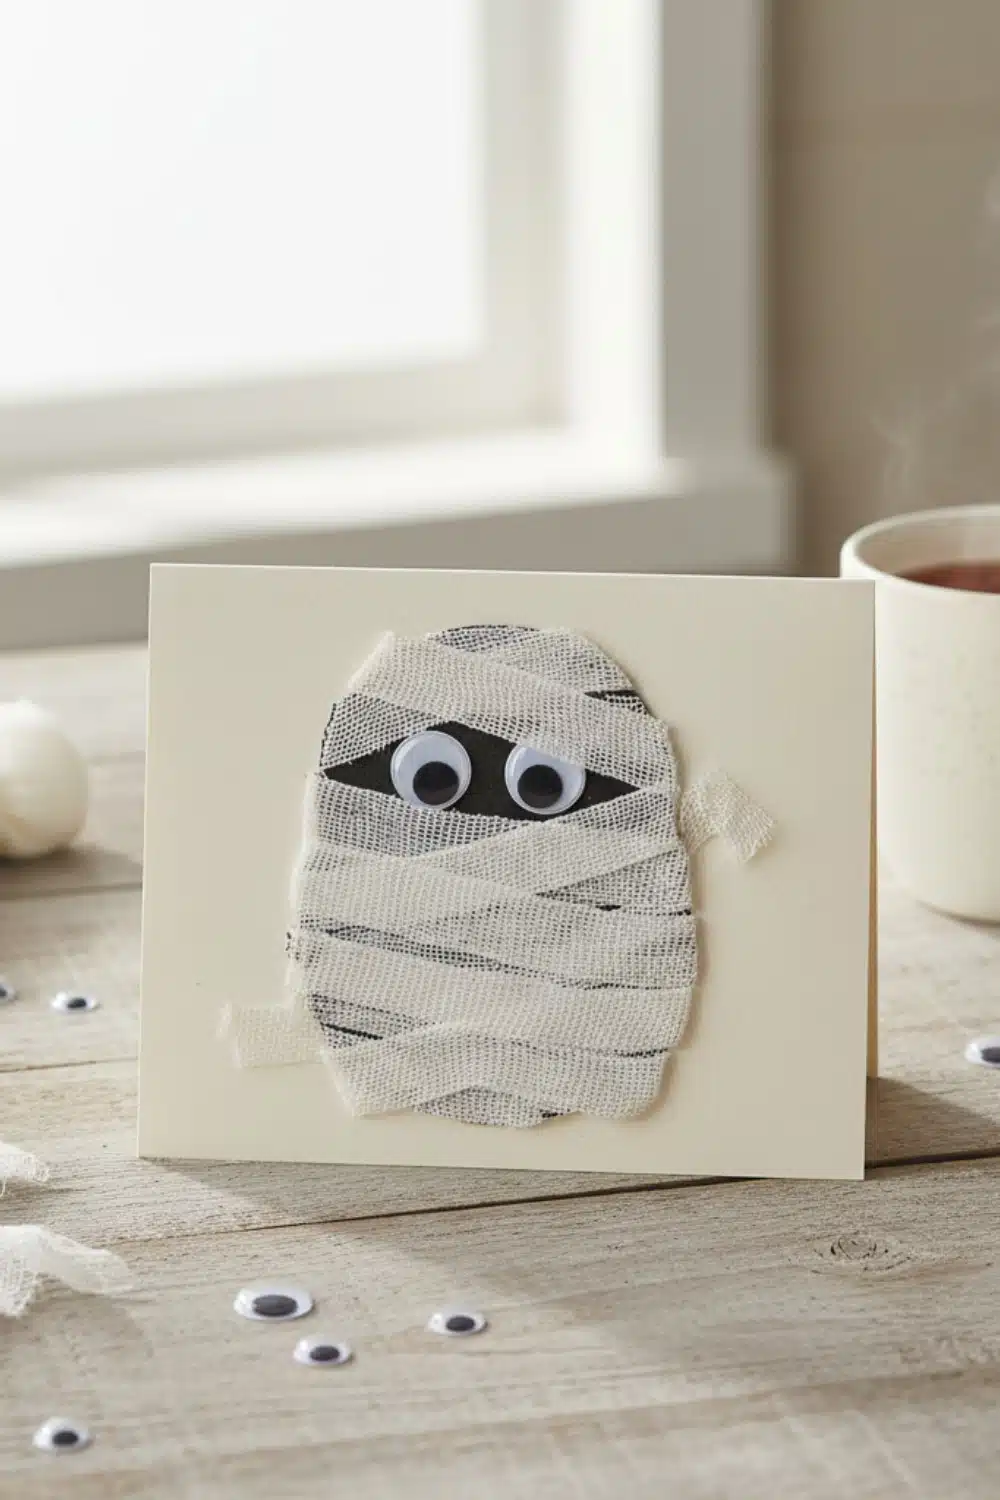
Here's the plan:
Start with a folded piece of cream cardstock for your base.
Cut a rounded mummy shape from black construction paper.
Glue this shape onto the front of your card.
Now, cut several thin strips of white cheesecloth or medical gauze.
Layer and glue the gauze strips across the black shape, creating a wrapped effect.
This layering trick is also key to making Thanksgiving greeting cards that really pop.
Leave a small horizontal gap for the mummy's eyes to peek out.
Adhere two large googly eyes within the gap.
Allow a few ends of the gauze to fray and hang off the edges for a spooky, unraveled look.
Style It Your Way
For a Ghoulish Glow
Swap the standard googly eyes for a glow-in-the-dark pair for a fun surprise when the lights go out.
For a Colorful Creature
Use green or purple gauze instead of white to create a monster or alien mummy.
Shopping List for This Project
💡 Shopping Tip: For a mummy card that won't flop, grab a kit with cardstock that's at least 80lb weight.
Shopping links are AI-generated. Please verify details before purchasing.
2. Build a Haunted Window Shaker Card for Spooky Interactive Fun
Difficulty:
Medium | 1-2 hours
Est. Cost:
Under $50

Here's the plan:
Start by die-cutting a gothic window frame from black cardstock.
Cut a second, slightly smaller frame from textured purple paper to create the brick overlay.
Layer the purple frame on top of the black one for a cool, dimensional look.
Create a soft, spooky sky background using watercolor or ink blending techniques.
Adhere a clear acetate sheet to the back of your finished window frame.
Build up the shaker walls with thin foam adhesive strips around the window's inner edge.
Fill the shaker with glittery pumpkin and black bat confetti.
This becomes a key piece for your indoor Halloween decorations.
Secure your watercolor background to the foam tape, sealing everything inside.
Style It Your Way
For a Wintery Vibe
Swap bats for snowflakes and pumpkins for silver glitter. A cool blue and white background creates a frosty, magical window scene.
For a Haunted Forest
Use green and brown confetti for 'leaves' and add tiny paper ghost cutouts. A dark, moody background completes the spooky woods effect.
Shopping List for This Project
💡 Shopping Tip: For shaker cards, pick confetti jars with wide mouths; it makes filling your spooky scenes way easier.
Shopping links are AI-generated. Please verify details before purchasing.
3. Make a Spooky Pop-Up Ghost Family Halloween Card
Difficulty:
Easy / 20 minutes
Est. Cost:
Under $20

Here's the plan:
Start by folding a sheet of purple cardstock right down the middle.
Cover the inside with a mix of large and small silver glitter star stickers.
Cut three friendly ghost shapes from plain white paper.
Use a hole punch or scissors to create small black circles for the eyes and mouths.
Glue the spooky faces onto your white ghost cutouts.
Create three thin pop-up stands from white paper strips.
Attach the bottom of each ghost to the top of a stand.
Finally, glue the bottom of each stand to the inside crease of the card, spacing them out to create your floating ghost family.
Style It Your Way
For a Classic Twist
Use black cardstock for a spooky night sky and swap the ghosts for pop-up orange pumpkins.
For a Glam Look
Instead of white ghosts, use silver glitter paper and trade the stars for tiny gold moon stickers.
Shopping List for This Project
💡 Shopping Tip: For pop-up cards, choose kits with paper weight over 80 lbs so your ghosts don't get floppy.
Shopping links are AI-generated. Please verify details before purchasing.
4. Design a Witch's Spellbook Pocket Card with Secret Spell Tags
Difficulty:
Medium, 1-2 hours
Est. Cost:
Under $50

Here's the plan:
First, cut and score heavy purple cardstock to create the book's base and spine.
Use an embossing folder to press a subtle swirl pattern onto the front cover.
Apply a silver foil transfer for the central pentagram design and the ornate corner details.
Attach two small cardstock loops to the spine to complete the book look.
Line the inside with a lighter purple paper for a clean, finished edge.
Create a pocket on one of the inside panels using a piece of textured gray paper.
Stamp a potion bottle onto a small tag, using creative layering techniques from these unforgettable welcome back cards ideas.
Lightly brush the edges of the tag with brown or black ink to give it an aged look.
Slip the finished tag into the pocket for a bewitching surprise.
Style It Your Way
For a Grimoire Vibe
Swap the purple for black or faux-leather cardstock and use gold foil for a truly ancient and powerful look.
For a Love Spell
Switch to deep red and pink paper with rose gold foil for a romantic potion book perfect for an anniversary.
Shopping List for This Project
💡 Shopping Tip: For a spellbook card that feels ancient, look for 'deep emboss' or '3D embossed' cardstock.
Shopping links are AI-generated. Please verify details before purchasing.
5. Make a Dimensional 3D Candy Corn Card for a Sweet Greeting
Difficulty:
Easy / Under 15 minutes
Est. Cost:
Under $20

Here's the plan:
Start by folding a piece of high-quality, off-white cardstock in half to create your card base.
Next, cut three separate rounded sections from yellow, orange, and white paper or craft foam to form your candy corn.
Use small foam adhesive squares to stack the yellow, orange, and white pieces on top of each other, creating that cool 3D effect.
Center your finished candy corn and press it firmly onto the front of the card.
Finish the look by stamping or printing 'HAPPY HALLOWEEN' below in a clean, modern font.
This simple layering technique is one of many gorgeous thank you card ideas you can adapt for any holiday.
Style It Your Way
For a Sparkly Twist
Swap the plain paper for glitter cardstock. Who says candy corn can't be a little bit glamorous?
For a Ghostly Greeting
Use all-white paper for the 3D shape and draw a simple spooky face on top. Instant ghost, zero effort.
Shopping List for This Project
Target
Target
💡 Shopping Tip: For the crispest bows on your handmade Halloween card ideas, always choose a double-faced satin ribbon.
Shopping links are AI-generated. Please verify details before purchasing.
6. Create a Spooky Glow-in-the-Dark Silhouette Halloween Card
Difficulty:
Medium / 30 - 45 minutes
Est. Cost:
Under $25

Here's the plan:
Start with a folded piece of light gray or cream cardstock for your base.
Mask off a large circle on the front to create your moon.
Use a sponge to blend glow-in-the-dark ink around the circle for an eerie halo effect.
Peel off the mask to reveal your glowing full moon.
Next, cut a detailed haunted house and tree silhouette from black cardstock.
A cutting machine will make these intricate Halloween paper crafts a total breeze.
Carefully glue the silhouette over the moon to complete your spooky scene.
Style It Your Way
For a Classic Scare
Ditch the house and use a witch-on-a-broomstick silhouette instead. It's a classic for a reason, and way less property management.
For a Pop of Color
Who says the moon has to be green? Try blending a spooky blood-orange or a deep purple for a totally different vibe.
Shopping List for This Project
Wayfair
💡 Shopping Tip: For a light wood mantelpiece, choose solid oak or maple over pine to avoid that yellowish tint over time.
Shopping links are AI-generated. Please verify details before purchasing.
7. Craft an Interactive Spinning Potion Wheel Halloween Card Idea
Difficulty:
Hard | 2-3 hours
Est. Cost:
$50 - $100

Here's the plan:
Start by embossing a white cardstock panel with a subtle pattern for a textured border.
Stamp and color a bookshelf design onto a separate piece of cardstock.
Cut a circle window in the center of your bookshelf panel.
Create the interactive wheel by stamping a large potion bottle on one side and another design on the other.
Assemble the spinning mechanism behind the window so it turns with a pull-tab.
Stamp, color, and carefully cut out all the tiny books, ghosts, and potion bottles.
Adhere the bookshelf panel to your embossed base using foam tape for dimension.
Arrange your tiny cutouts on the shelves, popping some up for a cool 3D effect.
Finish with glittery bat cutouts and candy corn embellishments for that perfect Halloween touch.
This kind of detail is what separates good crafts from the truly unforgettable ones.
Style It Your Way
For a Christmas Vibe
Swap the potions for mugs of cocoa, the ghost for a gingerbread man, and use a festive red and green color palette.
For a Wizard's Study
Use deep blues and golds, replace the ghost with an owl, and add tiny scrolls and crystal balls to the shelves.
Shopping List for This Project
💡 Shopping Tip: For a super smooth spin on your potion wheel, choose a kit that uses a small metal brad as the center pivot.
Shopping links are AI-generated. Please verify details before purchasing.
8. Send a Cute Ghostly 'BOO!' Handmade Card This Halloween
Difficulty:
Easy, 20 - 30 minutes
Est. Cost:
Under $10

Here's the plan:
Start with a simple cream-colored card.
Add a stitched border for that perfect handmade touch.
Cut out a letter 'B' and an exclamation point from orange felt.
Next, create two friendly ghosts from white felt to stand in for the 'O's.
Give them some personality with large googly eyes.
Finish the ghosts with tiny bow ties in orange and purple.
Glue everything onto your card to spell out a cheerful 'BOO!'.
Style It Your Way
For a Spookier Vibe
Swap the googly eyes for small black felt circles and give the ghosts jagged, wispy tails for a more classic phantom look.
For a Touch of Glam
Outline your felt letters and ghosts with a thin line of glitter glue to make your Halloween greeting really pop.
Shopping List for This Project
Target
Amazon
💡 Shopping Tip: To prevent fraying on that purple satin ribbon, quickly kiss the cut edge with a lighter flame to seal it perfectly.
Shopping links are AI-generated. Please verify details before purchasing.
9. Unfold a Spooky Story with a Tri-Fold Graveyard Panorama Card
Difficulty:
Medium | 45 minutes
Est. Cost:
Under $25

Here's the plan:
Start with a long strip of cream-colored cardstock.
Score and fold it into three or four panels to create an accordion shape.
Use blending brushes to apply soft yellow, pink, and purple inks for a sunset background.
Next, cut spooky silhouettes from black cardstock using a craft cutting machine or detailed dies.
Create shapes like an old gate, several gravestones, and a gnarled tree with bats.
Arrange your pieces across the panels to tell a story, getting ideas from classic outdoor Halloween decoration ideas for the layout.
Carefully glue each silhouette in place to complete your spooky panorama.
Style It Your Way
For a Midnight Vibe
Swap the sunset background for a deep navy blue, and splatter white paint on it for a starry night sky.
For a Glam Look
Ditch the black silhouettes and use glittery purple or silver cardstock instead for a little unexpected sparkle.
Shopping List for This Project
💡 Shopping Tip: For a sturdy card that won't flop, always choose a kit with paper over 80 lbs.
Shopping links are AI-generated. Please verify details before purchasing.
10. Shake Things Up with a Jack-o'-Lantern Face Shaker Card
Difficulty:
Medium | 30 - 45 minutes
Est. Cost:
Under $25

Here's the plan:
First, die-cut a pumpkin shape from textured orange cardstock.
Cut a classic jack-o'-lantern face into the front of your pumpkin.
This is way easier than any of the things to carve into a pumpkin you've seen online.
Next, glue a clear acetate sheet behind the face to create a window.
Build a shallow border around the window using foam adhesive strips.
Fill the pocket with a mix of purple, silver, and black star confetti.
Seal the back with another pumpkin-shaped piece of cardstock.
Finish by attaching a small, embossed green stem to the top.
Style It Your Way
For a Ghostly Greeting
Swap the pumpkin for a friendly ghost shape. Fill it with tiny bat confetti for a card that's more sweet than spooky.
For a Glam Gourd
Ditch the matte paper for orange glitter cardstock. Pack it with gold and black chunky glitter for a pumpkin with some serious sparkle.
Shopping List for This Project
💡 Shopping Tip: For a crystal-clear shaker window, grab acetate sheets that are marked 'acid-free' to stop any yellowing.
Shopping links are AI-generated. Please verify details before purchasing.
11. Weave a Web of Mystery with a Layered Spiderweb Card
Difficulty:
Easy / 20 minutes
Est. Cost:
Under $50

Here's the plan:
Start with a crisp white card base.
Use a blending tool to create a soft sunset background with purple and orange inks.
Cut a detailed spiderweb shape from black cardstock using a die.
Coat the web cutout completely with fine black glitter for some serious sparkle.
Adhere your finished spiderweb onto the blended background for a cool layered look.
Style It Your Way
For a Classic Twist
Swap the blended background for solid orange paper and glue a tiny plastic spider onto the web for a fun jump scare.
For a Glam Look
Use a black card base with a silver glitter web instead, then write your message inside with a metallic silver pen.
Shopping List for This Project
Target
💡 Shopping Tip: For ribbon that holds a perfect shape, always choose a 'wired edge' over a simple satin one.
Shopping links are AI-generated. Please verify details before purchasing.
12. Surprise Them with a Hide-and-Seek Ghost Slider Card
Difficulty:
Medium | 1 - 2 Hours
Est. Cost:
Under $50

Here's the plan:
Start by die-cutting the main card layers from lavender and mint green cardstock.
This will form the base and front of your adorable haunted house.
Next, die-cut all the detailed pieces like the roof, windows, door, and fence in coordinating pastels.
Assemble the house front by carefully gluing on the windows, door, and tiny fence details.
Now for the fun part of these cute Halloween cards, the ghosts.
Stamp and cut out several little ghost characters.
Create the slider mechanism by attaching one ghost to a pull-tab that slides behind the house.
Tuck the other ghosts behind the windows for a hide-and-seek effect.
Attach the finished house panel to the lavender card base using foam adhesive for dimension.
Finish your masterpiece by adding the fluffy clouds and the chimney to the roof.
Style It Your Way
For a Spooky Vibe
Swap the pastels for classic black, orange, and deep purple. A little spooky, a lot of fun.
For a Christmas Cottage
Ditch the ghosts for gingerbread people and swap the clouds for snowflakes. Same house, totally new holiday.
Shopping List for This Project
💡 Shopping Tip: For a super smooth slide, grab a kit with sturdy 80lb cardstock or heavier.
Shopping links are AI-generated. Please verify details before purchasing.
13. Make a Magical Bubbling Cauldron Infinity Halloween Card
Difficulty:
Medium / 1-2 hours
Est. Cost:
Under $50

Here's the plan:
Start with a long strip of lavender cardstock and accordion-fold it to create your card base.
Cut panels from lime green glitter paper, making them just a bit smaller than each folded section.
Glue a green glitter panel onto each lavender section to create a sparkly frame.
On separate white cardstock, stamp or print your cute cauldron, bone, and eyeball designs.
Use purples for the cauldrons and a vibrant green for the bubbly potion.
Add extra texture to the green potion splatters with glitter or embossing powder.
Carefully cut out your cauldron scenes and mount them right in the center of the green panels.
Style It Your Way
For a Classic Scare
Ditch the cute cauldrons for spooky black cat and witch hat stamps. Swap the color palette to classic orange, black, and silver glitter.
For a Pumpkin Patch Vibe
Replace the cauldrons with smiling jack-o'-lanterns. Use shades of orange, brown, and gold glitter for a warm, autumnal feel.
Shopping List for This Project
💡 Shopping Tip: For crisp, clean cuts on detailed cards, always choose a die set made from 100% steel.
Shopping links are AI-generated. Please verify details before purchasing.
14. Craft a Magical Apothecary Cabinet Gatefold Halloween Card
Difficulty:
Hard | 3 - 4 hours
Est. Cost:
Under $50

Here's the plan:
First, construct the main cabinet box and hinged doors using a light woodgrain cardstock.
Cut and fold interior pieces to create three sturdy shelves, gluing them evenly inside the cabinet.
Next, die-cut or carefully hand-cut an assortment of tiny potion bottle shapes from heavy paper.
Create a small window in each bottle and fill the space with a mix of colorful glitter in shades of purple, orange, and aqua.
Seal the back of each bottle with a small piece of clear acetate to keep the glitter contained.
Add tiny details like small cork stoppers cut from brown paper and handwritten labels.
For a rustic touch, tie a small twine bow around the neck of each bottle.
For extra magic, add whimsical swirls made from coiled craft wire to the tops of a few corks.
Finally, arrange your finished potion bottles inside the cabinet, using foam dots to create a cool 3D effect.
This amazing Halloween paper craft is so detailed it could almost be a piece of unique kitchen wall decor.
Style It Your Way
For a Mad Scientist Vibe
Use dark gray cardstock for the cabinet and fill the bottles with neon green and electric blue glitter. Swap the twine for thin silver wire to give it a laboratory feel.
For a Christmas Sweet Shop
Craft a bright red or white cabinet. Fill the tiny jars with red, white, and green glitter 'sprinkles' and tie them with tiny red velvet ribbons.
Shopping List for This Project
Wayfair
💡 Shopping Tip: For a truly 'floating' look, pick a shelf where the mounting hardware is completely hidden from view.
Shopping links are AI-generated. Please verify details before purchasing.
15. Use a Black Cat Die-Cut as a Clever Card Closure
Difficulty:
Medium, about 20 - 30 minutes
Est. Cost:
Under $25

Here's the plan:
Start with a simple, cream-colored folded card base.
Cut a piece of swirled, dark purple cardstock to fit the front, leaving a thin border.
Slice the purple paper horizontally about two-thirds of the way down to create a top flap.
Use a die-cutting machine to create a spooky picket fence from black cardstock.
Adhere the fence silhouette along the bottom edge of the card.
Next, die-cut a classic black cat silhouette.
This clever trick is one of many great Halloween cards DIY ideas.
Carefully glue the cat so its paws are on the fence and its back holds the top flap closed.
Style It Your Way
For a Harvest Moon Vibe
Swap the purple background for a spooky, marbled orange or yellow paper to make that cat pop.
For a Ghostly Greeting
Trade the cat and fence for a friendly white ghost die-cut floating over some spooky trees.
Shopping List for This Project
💡 Shopping Tip: When buying a craft die, look for 'steel-rule' dies to easily cut thicker materials like heavy cardstock.
Shopping links are AI-generated. Please verify details before purchasing.
✨ 16. Bonus Idea: Build an Epic Haunted House Accordion Card
Difficulty:
Hard, 4-6 Hours
Est. Cost:
$25 - $75

Here's the plan:
Start by creating a multi-panel accordion base from heavy cardstock.
Design and print four different miniature room scenes for the interior panels.
Think a magical library, a bubbling potion lab, and a ghostly parlor.
This detailed approach is also perfect for creating other kinds of unique Airbnb ideas guests will love.
Next, carefully cut out the intricate layers of the pop-up haunted house.
Assemble the house facade, adding whimsical details like swirly accents and tiny window frames.
For that cozy glow, tuck small battery-powered LED lights behind the windows.
Attach the finished house to the top of the accordion base to complete your masterpiece.
Style It Your Way
For a Festive Flip
Swap the haunted mansion for a cozy cottage and create a pop-up Christmas village instead.
For a Personal Keepsake
Forget the ghosts and recreate miniature versions of the rooms in your own home for a custom dollhouse display.
Shopping List for This Project
Home Depot
💡 Shopping Tip: For upholstered dining chairs, check the fabric's 'double rub count'—anything over 15,000 is brilliant for surviving daily use.
Shopping links are AI-generated. Please verify details before purchasing.
Can't Wait to Start? Try These 3 Ideas First:
Conclusion
See? Making a memorable Halloween card is easier than you think.
It's all about adding that one little spark of magic.
Now you have tons of brilliant ideas to get started.
Which spook-tacular card will you try first?


